3D Scanner (Creality Raptor Pro)
The Creality Raptor Pro is a handheld 3D scanner that captures the geometry — and optionally the color — of real-world objects and turns them into texture-mapped 3D mesh models. Use it for reverse engineering, digitizing freeform shapes like body panels or organic forms, and full-surface capture where calipers and manual measurement are impractical. It handles objects from roughly coin-sized up to about 4 m (with markers), with a practical accuracy of about 0.05–0.2 mm depending on mode — far coarser than calipers, so it’s the tool for complex surfaces, not precision measurement of simple features. If you’re not sure this is the right tool for your project, see Which Machine? or ask a staff member.
WARNING
Handle the scanner with extreme care. It’s a precision optical instrument: don’t drop it, strain the cables, or touch the glass. If you smudge the glass, clean it with the included microfiber cloth only.
NOTE
The scanner’s lasers are Class 1 — eye-safe by design. No eye protection or special precautions are needed.
Before you start
Section titled “Before you start”- No training or checkout is required to use the scanner in the lab. To use it outside the lab, coordinate with staff first.
- You need a clear space to maneuver the scanner all the way around the object.
- The object — and the surface it rests on — should not be black, reflective, or transparent. If it is, scanning spray can fix it (see Common problems below).
- Bring an adequately powered laptop with a USB 3.0 port, set up next to the scanning area. Keep an eye on free disk space — scan files get decently large.
- If you’ll scan in a laser mode, you’ll need the reference markers from the kit (laser modes require markers; infrared mode doesn’t).
NOTE
For additional reference, the Raptor Pro’s official user manual is genuinely good.
Choosing scan and tracking modes
Section titled “Choosing scan and tracking modes”You make two independent choices for every scan: a scan mode (which light source captures the geometry) and a tracking mode (how the scanner knows where it is relative to the object). Choosing the wrong tracking mode is one of the most common reasons a scan fails.
Scan modes
Section titled “Scan modes”The Raptor Pro scans with NIR (near-infrared) structured light or with blue laser lines (7 parallel, or 22 crossed). NIR captures the whole field of view at once — fast, and it’s the only mode that captures color texture. The laser modes trace lines across the part for higher accuracy, but they require markers.
| Criteria | NIR structured light | 7 parallel laser lines | 22 cross laser lines |
|---|---|---|---|
| Pattern shape | Dot/speckle field | 7 parallel lines | 22 crossed lines (grid) |
| Advertised accuracy | 0.075 mm | 0.02 mm | 0.02 mm |
| Real-world accuracy (user-reported) | ~0.1–0.2 mm | ~0.04–0.1 mm | ~0.04–0.1 mm |
| Single capture area | 630 × 550 mm | 397 × 290 mm | 397 × 290 mm |
| Best object size | Medium–large | Small–medium | Medium–large |
| Color texture capture? | Yes (24-bit) | No | No |
Tracking modes
Section titled “Tracking modes”- Geometry mode tracks by the shape of the object itself — edges, curves, and corners become landmarks. Best for objects with complex, distinct geometry. It struggles with regular, repetitive, or symmetrical shapes: a cube, cylinder, or flat panel looks the same from every angle, so the scanner can lose its position or silently produce wildly incorrect geometry.
- Texture mode tracks by surface appearance — color patterns, markings, grain, or printed graphics. Best for visually rich but geometrically plain objects (decorated pottery, artwork, fabrics). It needs a visually distinct surface, and it works best with NIR since the laser modes capture no color.
- Marker mode tracks using the small reflective adhesive dots from the kit as fixed reference points. Best when neither shape nor texture gives the scanner anything to lock onto — smooth, plain, or symmetrical objects — and for large objects (up to 4 m). Required in the laser modes.
Marker tips:
- Use 6 mm markers for larger objects, 3 mm for smaller ones.
- Place markers irregularly, not in a grid, so the scanner can tell regions apart.
- The scanner must see at least four markers at all times to keep tracking — denser is safer.
- For small objects, don’t put markers on the object at all: lay a dense field of markers on the mat or table around it. Markers required by laser mode can be the supplied movable ones placed around and on top of the object, then removed in post-processing.
Operating
Section titled “Operating”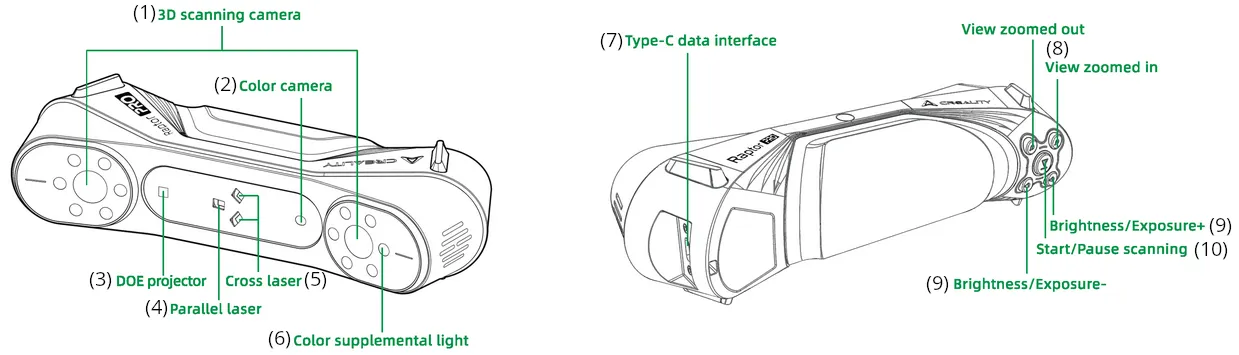
- 3D Scanning Camera: The cameras used to capture geometric data
- Color Camera: The cameras used to capture color textures to map to the scanned model
- DOE Projector: Projects the structured infrared light pattern onto the object
- Parallel Laser: Projects the parallel laser lines
- Cross Laser: Projects the crossed laser lines
- Color Supplemental Light: Illuminators for color camera (basically just flash)
- Type-C Data Interface: Interface to the computer and power supply
- View Zoom Out/In: Increase/decrease FOV on the scan preview window
- Brightness/Exposure +/−: Manual adjustment of scanning camera’s brightness
- Start/Pause button: works equivalently to the start/pause scanning button in CrealityScan
Set up and connect:
- Slide the American wall plug adapter into the DC power supply.
- Insert the USB Type-C plug into the Type-C Data Interface (7) and hand-tighten the screws.
- Connect the female and male ends of the DC power supply cable together.
- Plug the USB Type-A data cable into a USB 3.0 port on your computer.
- Plug the DC power supply into a standard 110V wall outlet.
- Start the CrealityScan 4 software. Once you get past whatever popups and dialogues, it should say “Scanner Connected” at the top left.
Scan:
- In CrealityScan, click “New Project” and complete the dialogue.
- At the top center of the screen, enter the Calibration tab and follow the on-screen instructions. You only need to calibrate once.
- Back in the scan tab, choose your scan mode and tracking mode — see Choosing scan and tracking modes above if you’re unsure.
- Customize the additional settings in the sidebar to your needs. If you’re using markers, do a “Global Markers” scan first — it detects markers better than the actual scan modes, and having all markers mapped before scanning makes the scan itself much easier.
- Click “Preview” (or press the center button on the scanner) and get a feel for how far to hold the scanner from the object. The colored distance sidebar helps here, though it can get confused.
- Click “Start” and perform your scan, watching the point cloud populate in real time. The point cloud lives in RAM while you scan — available RAM limits how many points you can capture and post-process. If you need to split the object into multiple scans, store them in the same project and let CrealityScan align them automatically. Expect to need more than one scan for anything with hidden or awkward faces. Tracking mode is a per-scan choice, so reconsider it for each one rather than reusing whatever the first scan used — the face you’re capturing now may give the scanner less to lock onto than the last.
- When you’re done scanning, click “Finish”.
Post-process:
-
From the project’s main page, use the editing toolbar to remove excess data points — [Shift]+[LMB] selects, [Ctrl]+[LMB] deselects.
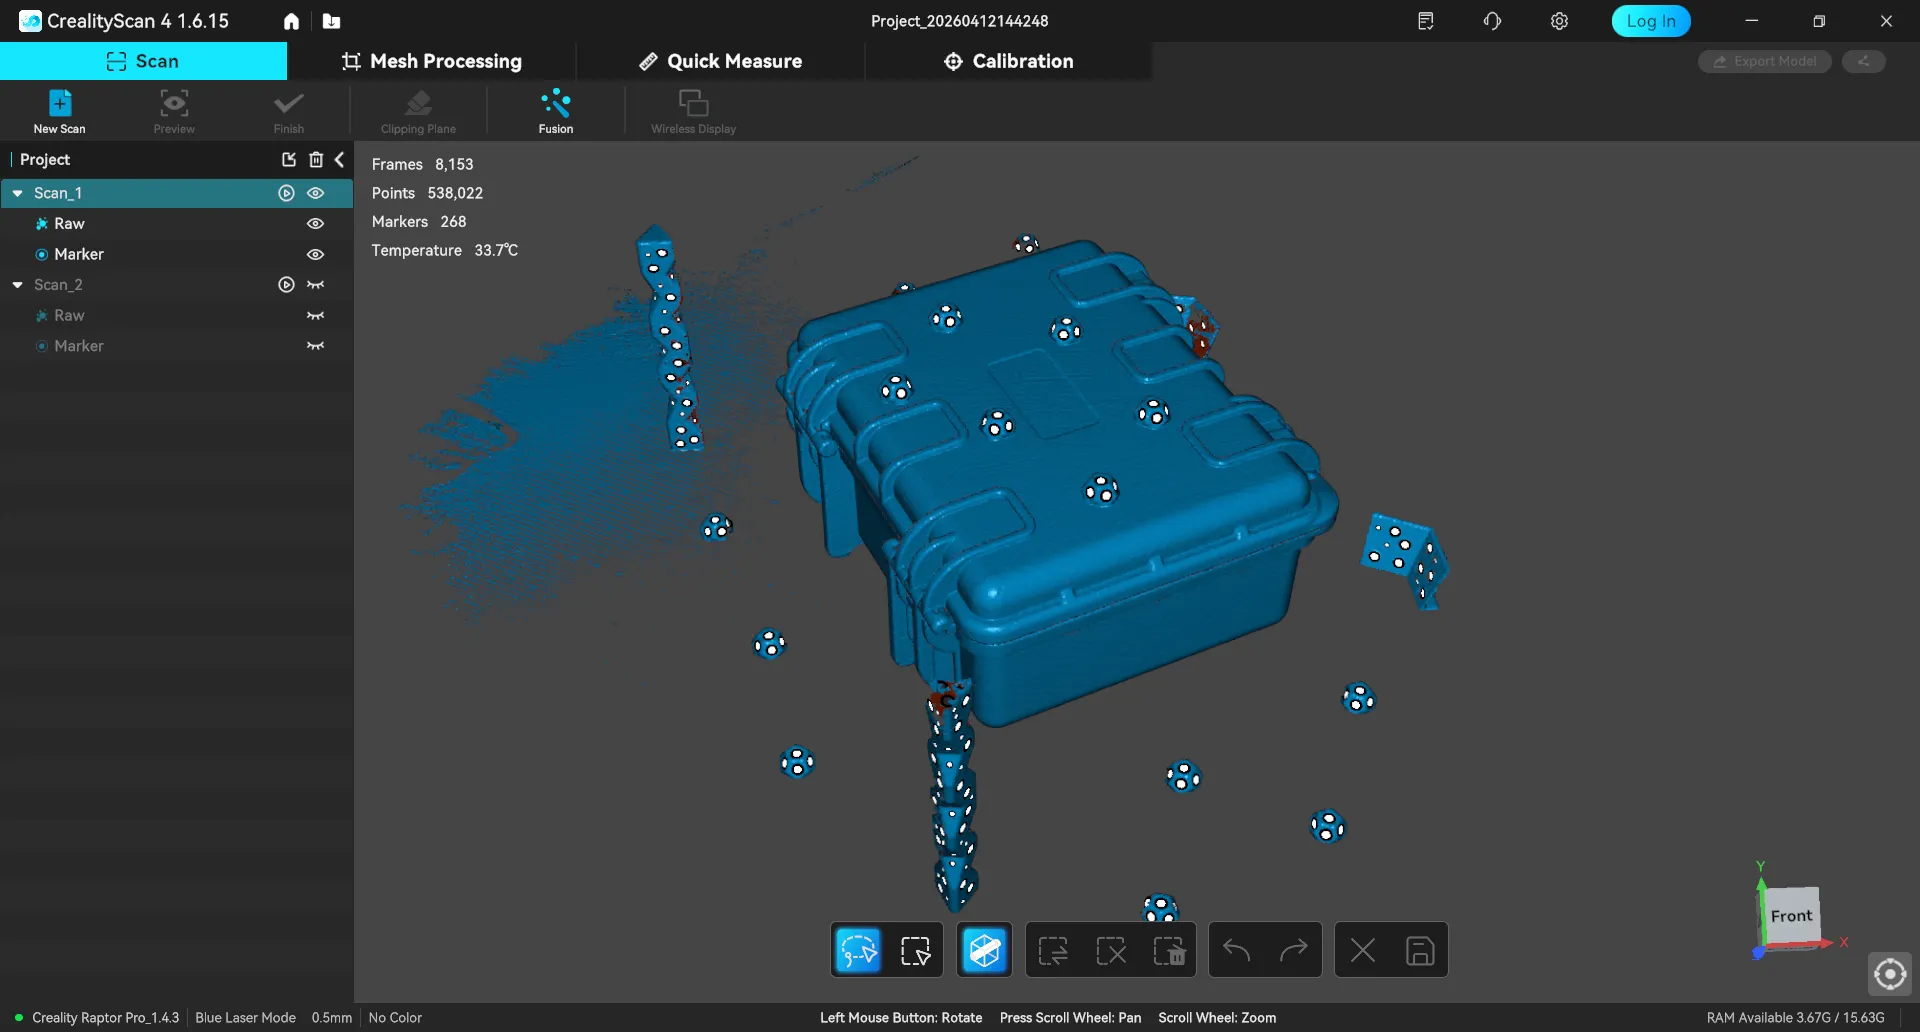
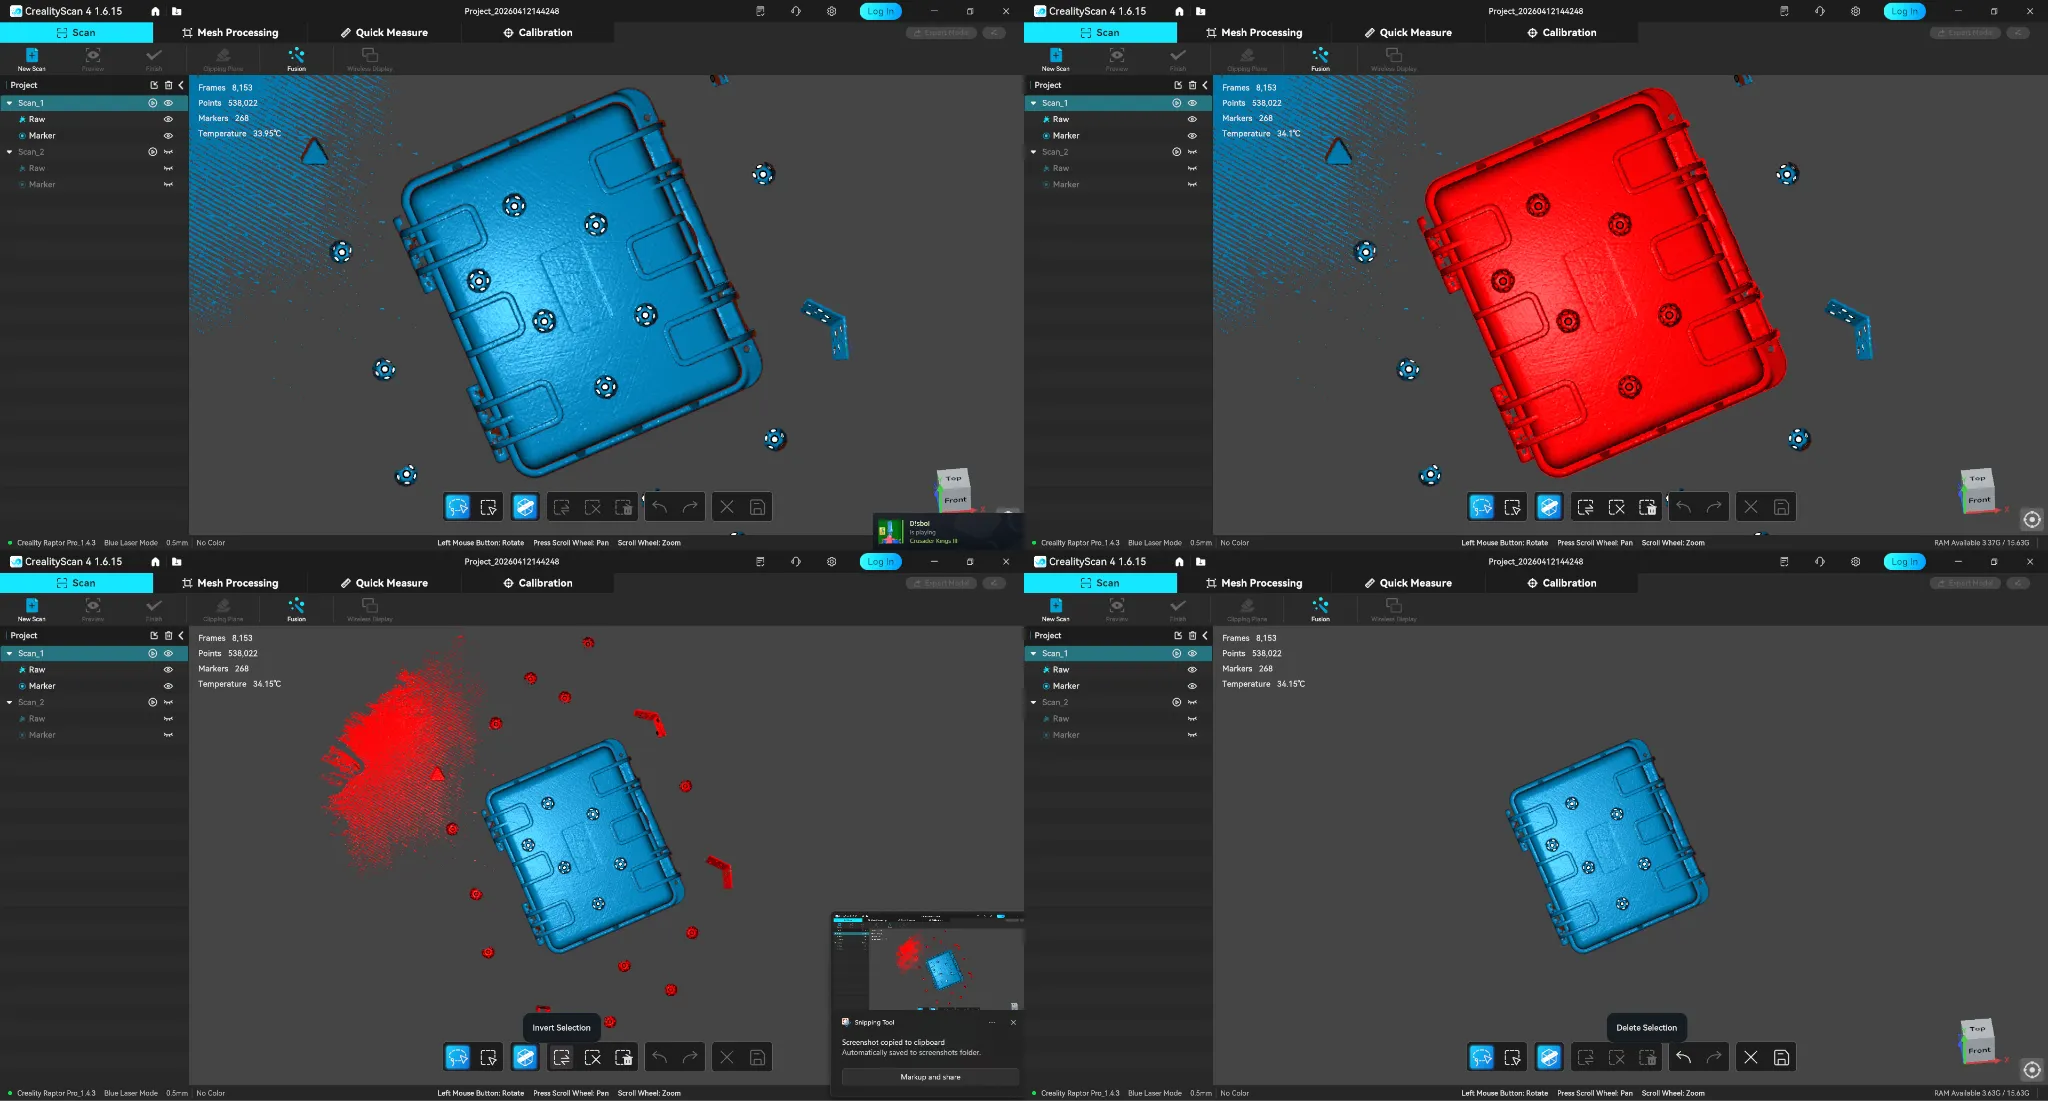
A quick way to remove most excess data: enable “Penetrate Selection”, right-click the viewport to switch to orthographic view, position the camera above the model, lasso-select only the model, then Invert Selection → Delete Selection → Save Edit.
-
Use the “Fusion” tool to process the scanned data into a mesh, then check again for excess geometry. You can now remove any reusable markers from your object.
-
For advanced cleanup — manual mesh edits, smoothing, simplifying, hole-fixing — switch to the “Mesh Processing” tab.
Depending on your use case, post-processing may be the bulk of the work. For specialized, higher-power tools, MeshLab, Blender, and CloudCompare are free and open source; Autodesk Meshmixer is free but proprietary (⚠️ deprecated since 2023; that link is unofficial).
Finishing up
Section titled “Finishing up”- Make sure the lens glass is clean — if not, use the included microfiber cloth.
- Close CrealityScan and unplug all the cables you connected during setup.
- Repack every item in the box the way you found it. If something seems wrong or missing, tell Fab Lab staff — and if the marker stickers are running low, let the lab assistant know.
- Take your object and your scan files with you — the lab has no storage.
Common problems
Section titled “Common problems”Don’t attempt to troubleshoot major issues yourself — get a staff member.
The scanner crashes, freezes, or loses connection. Unless something looks seriously wrong, don’t worry — it happens. Close CrealityScan, unplug and replug the scanner, then relaunch.
The scanner keeps losing track. Switch to a more effective tracking mode — Choosing scan and tracking modes explains which fits which object. If issues persist, add more markers or switch to marker-based tracking. Also check that the object isn’t black, reflective, or transparent; if it is, scanning spray may be needed.
The object has black, reflective, or transparent surfaces. Bring the object to the sink, shake the scanning spray well, and apply a light coat. Don’t over-apply — the effect only becomes visible once it fully evaporates. The spray is simply a mixture of isopropanol and talcum powder.
Comments
Something on this page wrong, missing, or not matching the machine in front of you? Say so here — comments are public and staff read them. Posting needs a free GitHub account, the same one the Edit page flow uses; if you already know the fix, editing the page is the faster route. Comments are readers talking to each other, not checked instructions — for anything urgent or safety-related, ask staff in the lab or on Discord.